Adapex header bidder SDK lets publishers leverage the power of our wrapper to request multiple programmatic bids for their mobile in-app inventory. The Adapex header bidder sends an initial ad call that goes to one or more partners requesting bids for inclusion in the ad server’s inventory allocation process.
- Adapex header bidder SDK calls our wrapper before requesting an ad from the primary AdServer SDK.
- Programmatic buyers get a first look at the inventory, submit a bid price, then the wrapper conducts a server-side auction between bids from different partners configured by the publisher.
- The header bidder includes the winning bid data (including bid eCPM and dealid), in the ad server call, which checks whether other buyers in the same priority tier can beat it. The impression is allocated to the highest yielding buyer while respecting other publisher controls that may have been set up on the ad server
- If the Adapex header bidder wins the bid, the ad server returns the winning ad to the header bidder SDK.
- Our header bidder renders any ad returned by the ad server.
You can also let winning bids compete with prices available from direct-sold ads by setting the wrapper SDK line items to the same priority as your direct-sold line items.
Adapex header bidder SDK provides the following benefits:
All the demand sources bid at the same time, replacing the sequential preferential ordering
- of buyers.
- Advertisers have the chance to obtain the best ad inventory.
- Publishers can potentially see up to a 50% monetization increase.
If your app uses a header bidder SDK version 2.4.0 or higher:
The SDK automatically declares the com.google.android.gms.AD_ID permission and can access the Advertising ID whenever it’s available. To learn more about the com.google.android.gms.AD_ID permission declaration, including how to disable it, see this Google Advertising ID article .
Required dependencies
|
Development environment |
Xcode version 12.5 – 13.3 |
|
Target environment |
iOS version 10.0 – 15.4 (iOS 9 support is deprecated in v1.6.2 and will be removed in a future release). |
|
Publisher/Placement Details |
Before integrating the Adapex wrapper SDK in your app to show banner or interstitial ads, you must have the following details:
You can create the Profile using your own account. |
| Ad Server Configuration for Header Bidder and SDK | This step is required so the GAM ad server, based on the actual bid price, can allocate impressions to the winning partner. |
| Ad Server SDK |
You must integrate the Google Mobile Ads SDK (typically referred to as simply, GAM or its former abbreviation DFP, throughout this documentation), to work with the Adapex header bidder SDK. |
Integrate Google Mobile Ads SDK (GAM)
Before integrating the Adapex header bidder SDK, you must integrate the Google Mobile Ads SDK into your app. Our header bidder SDK has been tested and certified with GAM SDK version 8.12.0 – 9.6.0. Our header bidder SDK should work with newer versions of GAM, but it has not yet been certified with any newer version.
Create a Podfile in your app’s Xcode Project directory (the directory containing your .xcodeproj file), If a Podfile doesn’t already exist.
Now add the following line to the Podfile:
|
1
|
pod 'Google-Mobile-Ads-SDK' |
Integrate Adapex Header Bidder SDK
Integrate the SDK and GAM event handlers into your application.
There are two ways to integrate:
- Using CocoaPods
- Integrate manually
Integrate using CocoaPods
Before you begin, check the compatibility matrix to make sure you’re using the appropriate handler for your project’s requirements.
Adapex-GAM compatibility matrix
The Adapex header bidder handler for GAM is the bridge between the header bidder SDK and an ad server SDK; use this compatibility matrix to find the right wrapper handler for your target GAM version.
Step 1: Add the following lines to the Podfile.
|
1
2
|
pod 'AdapexSDK'pod 'AdapexHandlerDFP' |
The Podfile should now look similar to this:
|
1
2
3
4
5
6
7
|
platform :ios, '10.0'target 'SampleApp' do pod 'Google-Mobile-Ads-SDK' pod 'AdapexSDK' pod 'AdapexDFP'end |
Step 2: Save the Podfile, then do the following:
- Open the Terminal application.
-
Change to your app’s project directory; for example:
cd/Developer/Projects/MyApp/ -
Now execute the following command:
podinstall--repo-updateIntegrate manually
Before you begin, check the compatibility matrix to make sure you’re using the appropriate handler for your project’s requirements.
Compatibility matrix
The Adapex header bidder handler for GAM is the bridge between the Adapex header bidder SDK and an ad server SDK. To ensure you’re using the appropriate handler for your project’s requirements, check the Adapex and GAM version compatibility matrix.
If the latest handler doesn’t support the GAM SDK version you’re using, download the appropriate handler before proceeding.
Follow these steps to perform a manual integration.
Step 1. Download the Adapex SDK zip file.
- Download and unzip the header bidder SDK v2.6.2 .
- Include the AdapexSDK folder in your Xcode project, select Copy items if needed, and Create groups while including them.
Step 2. Download the Handlers.
- Download and unzip Adapex Handlers v3.0.1.
- Include the
AdapexDFP folder in your Xcode project, and select Copy items if needed and Create groups while including.
Step 3. Add the following required Adapex header bidder SDK frameworks to your project:
- Foundation.framework
- UIKit.framework
- MessageUI.framework
- CoreLocation.framework
- EventKitUI.framework
- EventKit.framework
- AdSupport.framework
- SystemConfiguration.framework
- CoreGraphics.framework
- CoreTelephony.framework
- WebKit.framework
Step 4. Add the
-ObjClinker flag to your project’s Build Settings > Targets > Linking > Other Linker Flags: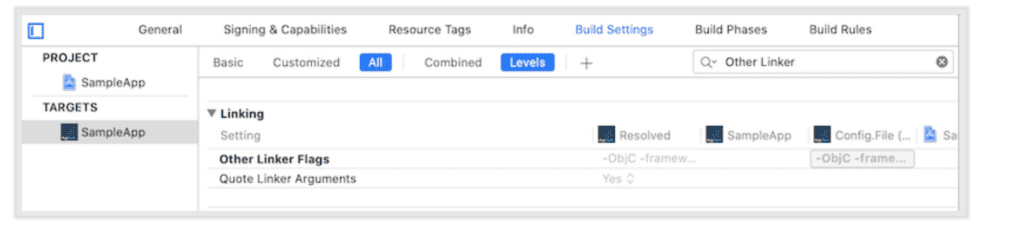
App transport security (ATS)
Our header bidder SDK defaults to secure ad calls and delivers only secure ads using App Transport Security (ATS), an iOS feature that encrypts data in transit using HTTPS, instead of HTTP. ATS enforces a minimum security level for communications between mobile apps and web services that support them. Software development kits (SDKs) for iOS 9.0 or greater enable ATS by default, but developers can opt-out by setting the app’s NSAllowsArbitraryLoads key to True.
If you configure the Adapex header bidder SDK to serve non-secure ads:
As described in Advanced topics > Configure SSL, then opt-out of ATS as shown in the example below.
The following log message appears when you request a non-ATS compliant ad via HTTP in your app running iOS 9 or greater:
App Transport Security has blocked a cleartext HTTP (http://) resource load since it is insecure. Temporary exceptions can be configured via your app’s
Info.plistfile.To allow non-secure ads over
http, disable ATS by including the following entry in your app’sInfo.plistfile:App Transport Security Settings12345<key>NSAppTransportSecurity</key><dict><key>NSAllowsArbitraryLoads</key><true/></dict>iOS 14 integration
iOS 14 brings several changes to enhance the ad experience for mobile users. See the following section to request App Tracking Transparency(ATT) authorization and to configure SKAdNetwork in your app.
Request App Tracking Transparency (ATT) authorization
To display the App Tracking Transparency authorization request to access the IDFA, update your
Info.plistto add theNSUserTrackingUsageDescriptionkey with a custom message describing your intended IDFA usage. For example:Privacy – Tracking Usage Description12<key>NSUserTrackingUsageDescription</key><string>The Advertising Identifier helps deliver ads that are relevant to your interests.</string>
The usage description appears in the App Tracking Transparency dialog box.
To present the authorization request, call
requestTrackingAuthorizationWithCompletionHandler:. The best practice is to wait for the completion callback prior to loading ads so that if the user grants the ATT permission, the ad server SDK can immediately use the IDFA in ad requests.Objective-CSwift123456789#import <AppTrackingTransparency/AppTrackingTransparency.h>#import <AdSupport/AdSupport.h>if(@available(iOS 14, *)) {[ATTrackingManager requestTrackingAuthorizationWithCompletionHandler:^(ATTrackingManagerAuthorizationStatus status) {// Use trackingAuthorizationStatus to determine the app-tracking permission status.// See ATTrackingManager.AuthorizationStatus for status enums.}];}For more information about the possible status values see,
ATTrackingManager.AuthorizationStatus.Best practices
- Add a priming message preceding the call to
requestTrackingAuthorizationWithCompletionHandler:to better explain the permission and data usage to users. - Request the ad only after post-authorization callback. This lets Adapex wrapper SDK immediately access and pass the IDFA in the ad request if that user approved the IDFA access request.
Configure SKAdNetwork settings to track conversions
The Adapex header bidder SDK is compatible with iOS 14 and supports Apple’s SKAdNetwork 2.0, which allows mobile apps to install attribution for demand partners buying in-app inventory from iOS 14, while also preserving user privacy.
To enable install attribution, you must update the
SKAdNetworkItemskey with additional network ID dictionary entries in your app’sInfo.plist.Get the latest SKAdNetwork ad network IDs
Include ad network IDs in your information property list:
-
Select
Info.plistin the Xcode Project navigator. -
Click the Add button (+) beside a key in the property list editor, then press Return.
-
Type the key name,
SKAdNetworkItems. -
Choose Array from the pop-up menu in the Type column, then enter the dictionary entries as shown below.
12345678910<array><dict><key>SKAdNetworkIdentifier</key><string>example100.skadnetwork</string></dict><dict><key>SKAdNetworkIdentifier</key><string>example200.skadnetwork</string></dict></array>
If users tap an ad that attempts an API call for an ad network that doesn’t have an entry in the
Info.plist, the system won’t initiate install validation. Also, note that missing this step can negatively affect the fill rate.Supported ad formats
Now that you’ve integrated the Adapex header bidder iOS SDK, you’re ready to begin implementing ads in your app. Our wrapper iOS SDK currently supports two ad formats:
Banner :
Mobile banner ads usually appear as a short strip spanning the width of the app page or screen, positioned above or below the app content. Banner ads can be static or animated images, any mobile-compatible rich media ad format, or in-banner video.
Native ads are native assets rendered via an app’s native UI components to provide a consistent visual design. Though the header bidder SDK doesn’t support native ads separately, you can combine native and banner requests to support native inventory through the SDK’s header bidding feature.
Mobile interstitial ads fill the screen or page and require the user to dismiss the ad before they can view/access the app’s main content. Interstitial ads also support static or animated full-screen images, any mobile-compatible rich media ad format, or full-screen video.
Rewarded :
Mobile rewarded ads fill the screen or page and require the user to dismiss the ad before they can view/access the app’s main content. Rewarded ads support only full-screen video ad formats. Once video playback completes the user receives in-app rewards